Rokies.app: Your Key to Effective Cloaking and Secure Promotion
In the world of internet marketing, where competition grows fiercer every day and advertising platforms impose increasingly stringent rules, cloaking has become an essential tool for maintaining campaign efficiency. Rokies.app is a modern cloaking service that empowers marketers to bypass platform restrictions and filters, ensuring both security and high conversion rates. In this article, we’ll explore why Rokies.app stands out among competitors, the advantages it offers, and how its powerful filters and functionality can elevate your campaigns to the next level.
Why Cloaking is Necessary
Cloaking is a technology that enables you to display different content to different visitors to your website. For instance, advertising platforms like Facebook, Google, or Instagram see one version of your page (compliant with their rules), while real users see another (featuring your offer). This is particularly valuable in affiliate marketing, where strict moderation policies can block your campaigns. Cloaking helps protect your advertising budgets, boost conversions, and promote offers securely.
Getting to Know Rokies
Rokies.app is a relatively new cloaking service that has already won the hearts of many users who rely on it. It has become a trusted ally in protecting their ads from being blocked, thanks to its flexible pricing plans, extensive range of filters, easy setup, and precise analytics that allow clients to track every single click on their ads in the finest detail.
Unpacking Rokies: The Secrets of Cloaking Inside
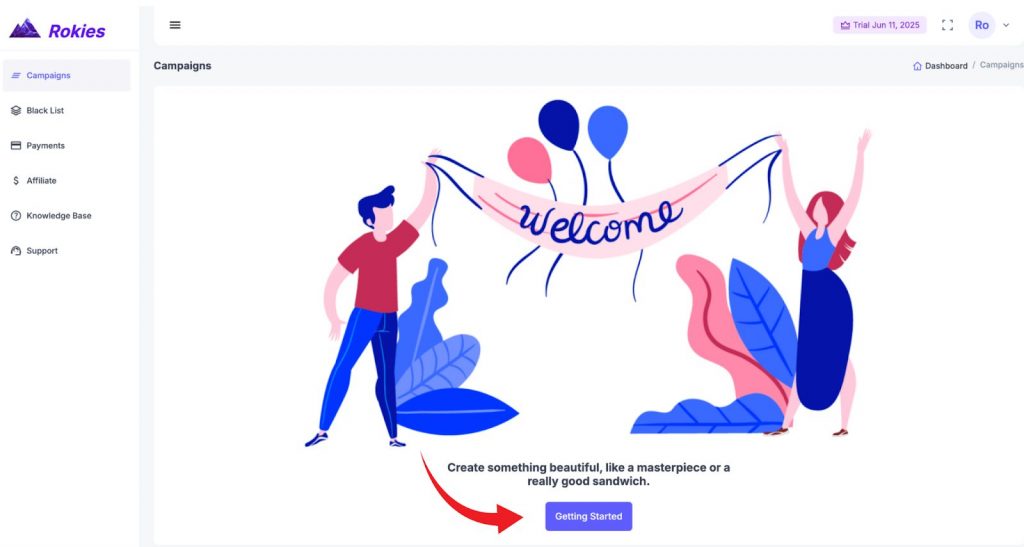
Once you’ve chosen the pricing plan that suits your needs (we’ll discuss these later), you’ll be greeted with a user-friendly dashboard to get started.
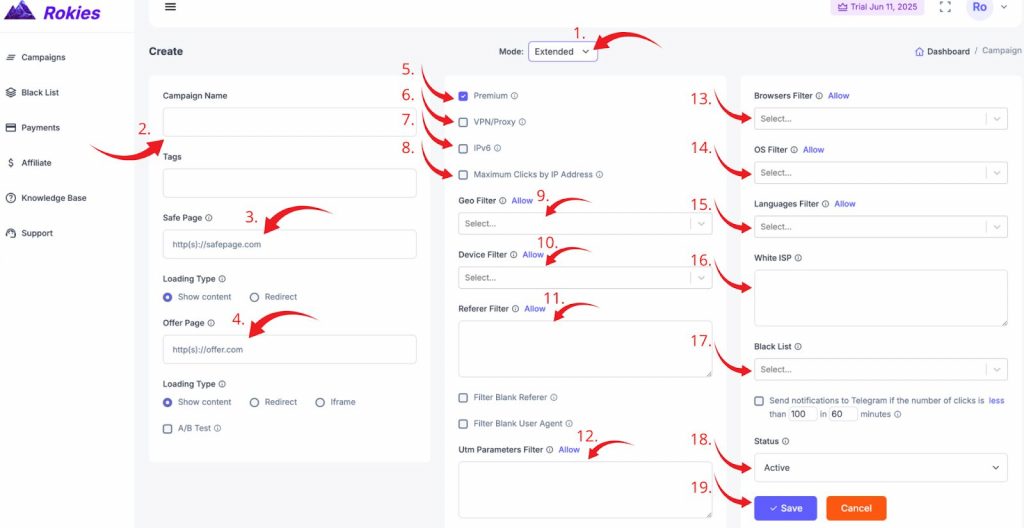
After completing the necessary integration—and Rokies offers plenty of options, including WordPress, Snippet. JS, Keitaro, Local, and Standard—you can proceed to explore the filters. Here’s how it works:
- Filter Modes: Rokies provides two filter modes: “Simple” and “Extended.” For this article, we’ve chosen the “Extended” mode to showcase more available filters, as “Simple” includes fewer options.
- Campaign Name: Choose a name that’s convenient and suitable for you.
- Safe Page (White Page): Insert the link or specify the path to your Safe Page (also known as the White Page).
Note: For Local integration, ensure the script is named index.php. For Snippet integration, rename the index.html file of your White Page to index.php. For Standart integration the script must be named index.php. If you already have an index file in the folder, rename it or delete it. - Offer Page: Insert the link or path to the folder of your Offer Page.
- Premium Filter: Make sure to enable this filter. It’s the most critical one, as it protects your ads from bots and moderators by automatically filtering their IPs and ISPs to the White Page using an AI-driven database.
- VPN/Proxy: Cloaking automatically filters users accessing your ads via VPN or proxy.
- IPv6: Enables filtering of users with this IP format (IPv6 offers greater flexibility in configuring network devices and easily identifies unique addresses for each device).
- Maximum Clicks by IP Address: Set the maximum number of clicks allowed from a single IP address. Visitors exceeding this limit will be filtered.
- Geo: Select the country or multiple countries from which you want to allow or filter traffic.
- Device: Choose the devices to allow or filter (e.g., computer, desktop, phone, etc.).
- Referer: Allows you to identify the traffic source. For example, you can specify sources like Facebook, TikTok, etc., and filter traffic based on this parameter. You can enter “facebook,” and traffic from Facebook will be allowed, while other sources and direct visits will be filtered. If you have multiple values, enter each on a new line.
Note: Filter Blank Referer—if enabled, all direct traffic to the site will be filtered. - UTM Parameters: Filter traffic using UTM parameters specified in your ad domain.
Note: Your ad domain might look like mydomain.com?this-is-tiktok. Here, this-is-tiktok is the UTM parameter. To allow visitors with this UTM, enter only part of the word, e.g., tiktok or this. All other visitors without this UTM will be filtered. For multiple values, enter each on a new line. - Browsers Filter: Select the browser through which traffic will be filtered.
- OS Filter: Choose the operating system to allow or filter traffic from.
- Languages Filter: Select the browser language to filter or allow traffic.
- White ISP: Specify ISPs that are allowed to access your ads, overriding the filters above.
- Black List: For each campaign, you can create a separate blacklist to add IPs and ISPs of suspicious visits to your ads.
- Status:
- Active: The campaign is active, and filters and cloaking are operational.
- Pause: All clicks are directed to the White Page, considering your filters.
- Dedicated: Set a click limit (e.g., 30) for the “Filter After” parameter. The campaign will pause for the first 30 clicks, then switch to active mode.
Note: Before launching your ads, we recommend enabling Dedicated for 30 clicks during moderation.
- Save: Save your settings and check your cloaking performance in your analytics.
Note: Filters like Geo, Device, Referer, UTM Parameters, Browsers, OS, and Languages have two options: “Allow” and “Disallow.”
Example: If you enable the Geo filter in “Allow” mode and select the Netherlands, traffic from all countries except the Netherlands will be filtered to the White Page. If you enable “Disallow” mode and select the Netherlands, only traffic from the Netherlands will be filtered to the White Page. The same logic applies to all other filters listed above.
Rokies Statistics: Uncovering the Numbers and Their Meaning
Now that we’ve explored the core features of Rokies.app, it’s time to dive into statistics—the heart of any cloaking service’s analytics. In this section, we’ll review the key statistical parameters provided by Rokies and explain what each one means, enabling you to leverage this data to optimize your campaigns effectively.
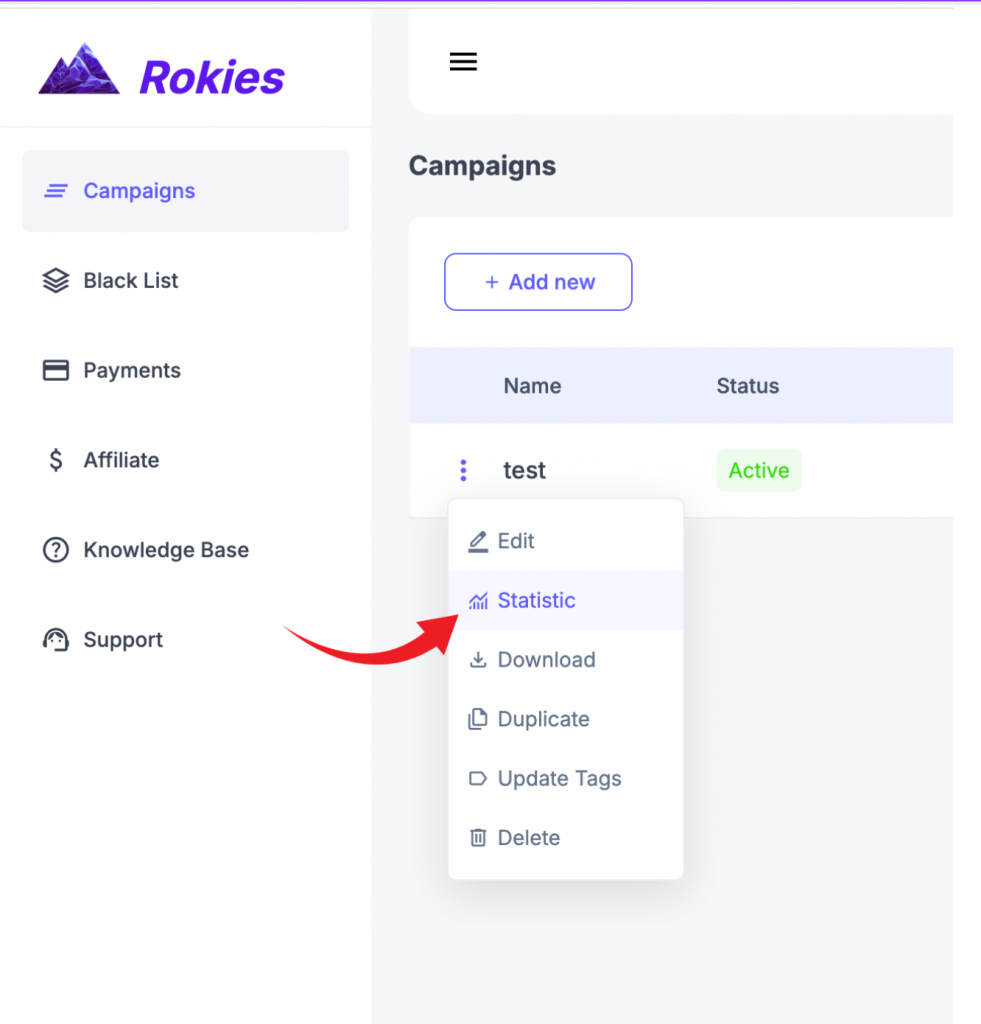
Navigate to the main campaign menu, click on the campaign itself or the three dots, and select “Statistic.”
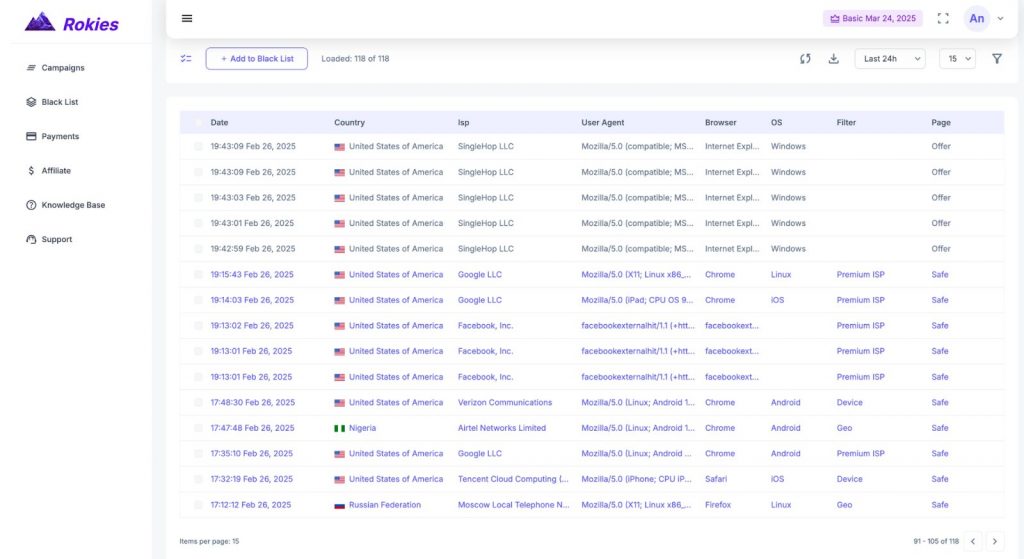
Next, we’ll see the complete statistics for our campaign, including all clicks, transitions, and the reasons why users visiting your ads were filtered (or not filtered).
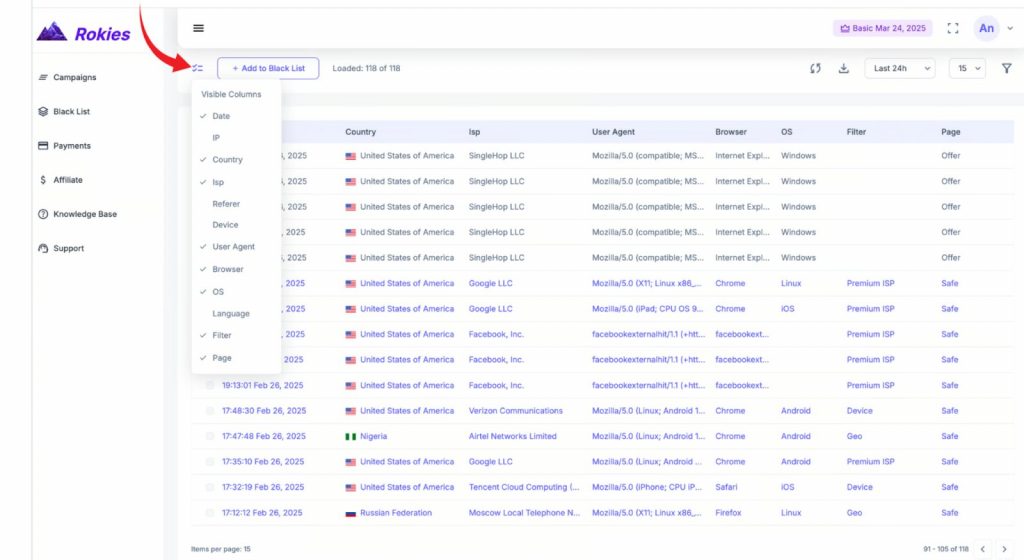
Let’s start by selecting the metrics you want to display in the statistics.
By choosing the necessary parameters, we can easily focus on the data that matters most.
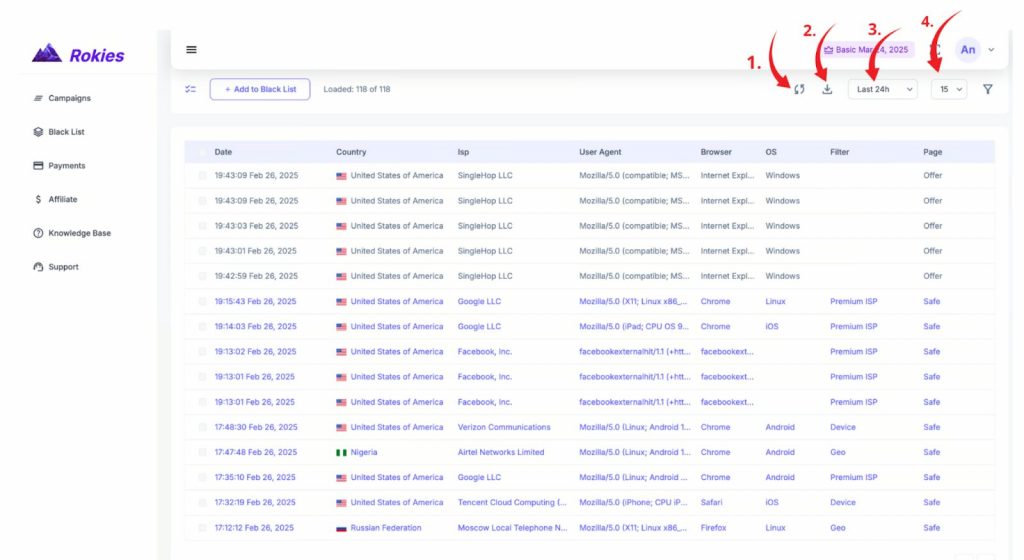
Additional Features of Our Statistics Panel
- Manually refresh the statistics as needed.
- Download the entire statistics report as a file to your device.
- Select the time range for which you want to view the statistics.
- Customize the number of clicks displayed per page.
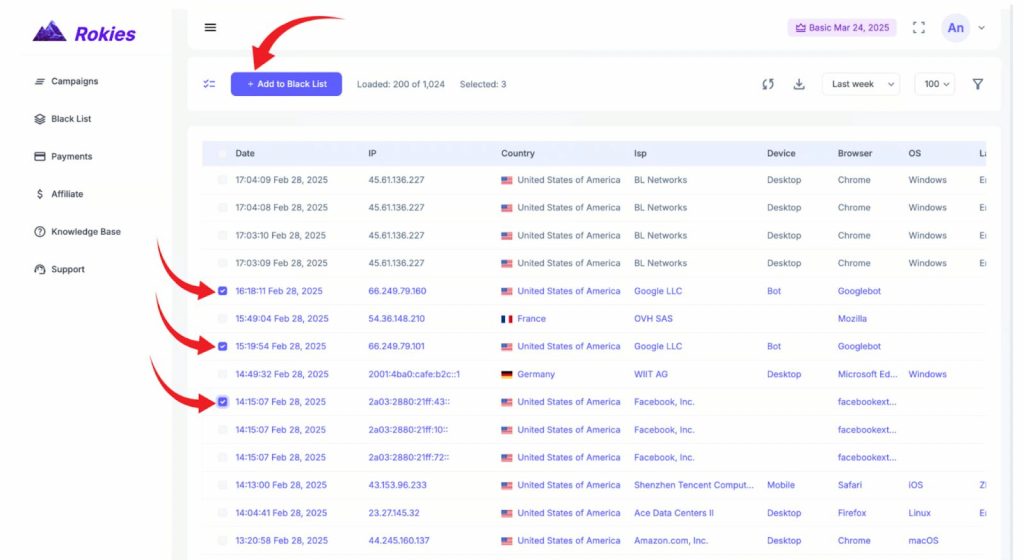
Creating a Black List
Next, we’ll demonstrate how to work with the “Black List” feature.
First, select the clicks you want to add to the Black List.
The next step is to add these clicks by simply clicking the “+ Add to Black List” button.
Reviewing Other Statistics Parameters
We’ve numbered the main parameters that allow you to track visitors to your ads:
1. Date – Here, you can see the exact date and time of a click on your ad.
2. IP – The IP address of the user who clicked through.
3. Country – The country from which the click originated. This helps you determine if the click came from your desired country. If not, cloaking will naturally filter the click to the White Page. The same applies to the following statistics parameters we’ll review, depending on how you initially configured your filters.
4. ISP – A filter that shows the user’s internet service provider for the click.
5. Referer – Displays the traffic sources from which the user came. If you only want specific sources, it’s best to specify them in the campaign settings, as we explained earlier.
6. Device – The device used by the user (e.g., computer, desktop, phone).
7. User Agent – A string identifying the user (e.g., browser, bot, or mobile app).
8. Browser – This could be Google, Mozilla, Safari, etc. You can configure the browsers you want to allow in your campaign’s filter settings.
9. OS – The operating system used to access your ad (e.g., Windows, macOS, etc.).
10. Language – The browser language of the visitor.
11. Filter – A crucial parameter in our statistics, this shows the reason why a user was filtered.
12. Example: If the Filter parameter shows “GEO,” it means the user was filtered to the White Page because their geolocation doesn’t match the GEO filter settings in your cloaking configuration.
13. Page – No less important than the previous parameter, this shows which page the user landed on—White Page or Offer Page.
Note: Generally, if a user lands on the White Page, their parameters are highlighted in blue; if they land on the Offer Page, they are highlighted in gray.
Rokies Statistics Summary and Transition to Pricing
In this section, we’ve explored the core principles of Rokies.app’s statistics, which empower marketers to precisely analyze campaign data. The service offers powerful tools for tracking key metrics, accessible through a user-friendly admin panel and a Telegram bot that enables real-time statistics monitoring directly from your device. Now that we understand how Rokies helps optimize campaigns, let’s move on to an equally important topic—the cost of the service and available pricing plans.
Rokies Pricing: Choose the Plan for Your Campaigns
Rokies.app offers three pricing plans tailored for both beginner marketers and professionals managing large-scale campaigns. Each plan varies in the number of active campaigns and cost, allowing you to flexibly choose the best option based on your needs. Let’s take a closer look:
- Basic — $99/month
The perfect choice for beginners or those testing cloaking. This plan allows you to run 1 active campaign, providing full access to Rokies’ functionality, including powerful filters and real-time statistics via the admin panel and Telegram bot. - Pro — $199/month
Ideal for experienced marketers who need more room to maneuver. This plan supports up to 10 active campaigns, making it an excellent solution for managing multiple projects simultaneously while retaining all the benefits of analytics and automation. - Superior — $299/month
Designed for professionals and agencies handling large volumes. This plan allows up to 10,000 active campaigns, offering maximum flexibility and scalability for complex cloaking strategies.
Each plan includes access to all of Rokies.app’s key features, such as flexible filters, Telegram bot integration, and detailed statistics, making the choice of plan solely a matter of your campaign scale.
Use the promo code GEELARK on Rokies.app to select any plan with a 20% discount.
Conclusion: Why Rokies.app is Your Choice for Cloaking
Rokies.app is a new but already popular cloaking service that helps marketers bypass platform restrictions and boost campaign efficiency. We’ve explored its key advantages: powerful filters, user-friendly statistics accessible via the admin panel and Telegram bot, and flexible pricing plans.
Rokies.app combines simplicity, functionality, and scalability, making cloaking both accessible and effective.
Wishing you successful campaigns and high conversions with Rokies.app!


