Automate Posting Reels Video on Instagram: Easy Scheduling & Bulk Uploads
Updated on
Home » Blog » Automate Posting Reels Video on Instagram: Easy Scheduling & Bulk Uploads
Instagram Reels have exploded in popularity, becoming a central way for creators, businesses, and individuals to share engaging short-form video content. But consistently posting captivating Reels, especially across multiple accounts, can quickly become a time-consuming chore. Manually uploading, crafting captions, adding trending sounds, and scheduling each Reel for every profile can be a significant drain on your resources.
This comprehensive guide will show you how to streamline the entire process of how you post Reels videos on Instagram, saving hours while boosting your consistency and reach.
Short Videos Are Taking Over Social Media Right Now
Instagram Reels have become incredibly popular because they match how people prefer to consume content. These short videos work so well because they grab attention quickly and get the message across in just a few seconds. When viewers scroll through their feeds, they’re more likely to watch a short, engaging Reel from start to finish, making it a powerful way to connect with your audience. Plus, since Reels are designed specifically for mobile viewing and allow for creative expression, they’ve become a go-to format for brands looking to make a lasting impression on their followers.
How You Can Connect with Your Followers Using Instagram Reels
Reels offer a unique opportunity to connect with your audience on a more personal level. You can use them to share behind-the-scenes glimpses, run interactive polls, or host Q&A sessions. Here’s how to make your Reels more engaging:
Use trending audio and effects to capture attention.
Ask questions and encourage viewers to leave comments.
Create content that is relatable and resonates with your target audience.
By creating content that sparks conversation and encourages interaction, you can build a loyal following and foster a sense of community around your brand.
Jump on Trends to Get More Eyes on Your Reels
Getting your Instagram Reels noticed is all about staying up-to-date with what’s popular. When you use trending sounds, join in on challenges, and participate in viral moments that fit your brand, you can reach more people naturally. The key is to make these trends your own while staying true to your content style. By keeping an eye on what’s popular in the “For You” page and adding your personal touch, you can create Reels that both catch attention and feel authentic to your brand.
How to Streamline Your Instagram Reels Workflow
To really get the most out of Instagram Reels, you need to streamline your workflow. It’s about making the whole process smoother, from the moment you have an idea to when your Reel is live. This means finding ways to save time, stay organized, and make sure your videos look their best. Let’s explore how you can optimize your Reels creation and posting process.
Creating Your Reels Content in Batches
Instead of scrambling to create Reels every day, try batching your content creation. Set aside a specific time each week or month to brainstorm ideas, film multiple videos, and edit them all at once. The best times to post your Reels are typically weekdays between 9 AM and 12 PM, or between 4 PM and 7 PM when engagement rates are highest. According to a study, posting during these peak hours can increase your views by up to 25%. This smart approach helps you stay organized and keeps your creative energy flowing. By working in batches and scheduling posts for optimal times, you’ll find yourself less stressed and always prepared with fresh content to share. Plus, your videos will have a more consistent feel since you’re creating them in one focused session.
A well-organized file system is key to managing your Reels content effectively. Instead of keeping everything in one folder, create a structured system on your computer or cloud storage where you store all your videos, audio, and other materials. Having a dedicated folder for each Reel project, with clear names and organized subfolders for different types of content, will make your workflow much smoother. This simple organization method helps you quickly find what you need and keeps your creative process running without interruptions.
Getting Your Video Specs Just Right for Instagram Reels
To ensure your Reels look their best, you need to optimize your video formats. Instagram recommends specific settings for resolution, aspect ratio, and frame rate. Here’s a quick guide:
Resolution: 1080×1920 pixels (full HD).
Aspect Ratio: 9:16 (vertical).
Frame Rate: 30 frames per second.
File Type: MP4 is generally the best choice.
Using these settings will help you avoid issues like pixelation, cropping, and slow loading times. Plus, your Reels will look more professional and engaging.
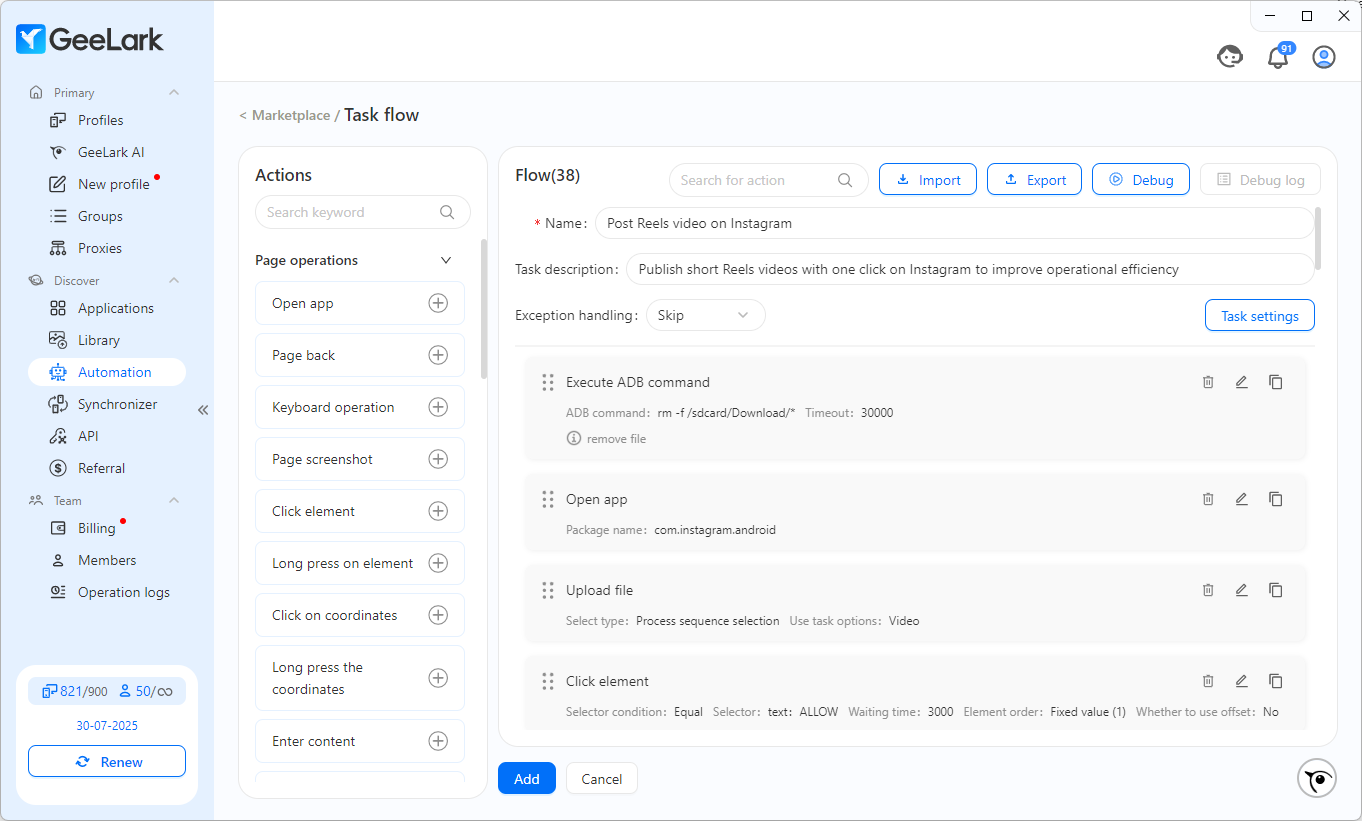
Automate Posting Reels Videos on Instagram with GeeLark
The Post Reels video on Instagram template is an Instagram automation tool developed by GeeLark. You can automatically upload, caption, and publish your short-form video content to your Instagram accounts. GeeLark takes over the repetitive manual steps, allowing you to manage your Reels publishing with unparalleled efficiency.
Use it to automate your posting work:
Schedule your Reels to go live exactly when you want them to, without needing to be online.
Prepare multiple Reels, captions, and details in one go, then upload them in bulk.
Easily select videos from your local files or an existing content library within GeeLark, with smart matching options for bulk uploads.
How to Use “Post Reels Video on Instagram” with GeeLark
Automating your “Post Reels video on Instagram” with GeeLark is designed for maximum efficiency and ease of use. Here’s how to get started:
Step 1: Find the “Post Reels video on Instagram” Template
Before starting, ensure you’ve downloaded the correct version of the Instagram app and are logged into your accounts on each selected profile within GeeLark’s cloud phones.
Begin by navigating to the GeeLark automation marketplace:
Log in to your GeeLark account.
On the left-hand sidebar, click on Automation. This will take you to the GeeLark Marketplace.
In the Marketplace section, search for the “Post Reels video on Instagram” template.
Step 2: Choose How You’ll Post Your Reels
GeeLark provides three flexible ways to initiate your Reels posting tasks:
1.Create a Regular Task: Click the Add button and select the profiles (your cloud phones) that will post the Reels.
Click Add task to define specific posting tasks. You can add as many profiles and tasks as you need.
Single task: For posting one Reel, you can directly edit the desired publish date, caption, and video through the GeeLark dashboard for that specific task.
Batch tasks: For managing multiple Reels and tasks, click Edit table to download a template spreadsheet. Fill in your “normal missions” (which include details for each Reel like video file, caption, publish date) and then upload the completed spreadsheet. If you need to switch between different sets of tasks, simply download the template again, update with new information, and re-upload.
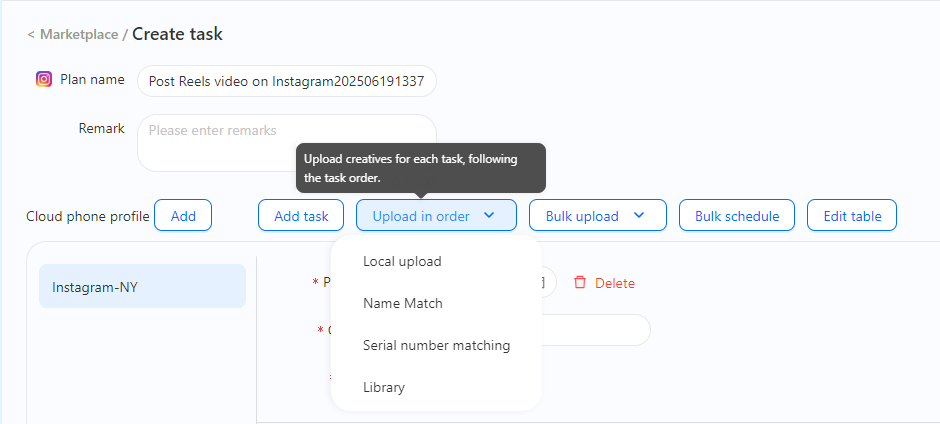
Upload in order: Choose videos from your local files or the creatives library (where you’ve already uploaded materials to GeeLark). You can match files easily using:
Name match: Automatically pairs uploads when the material name is the same as the environment (cloud phone) name. You can use formats like name-numberfor multiple materials in one environment.
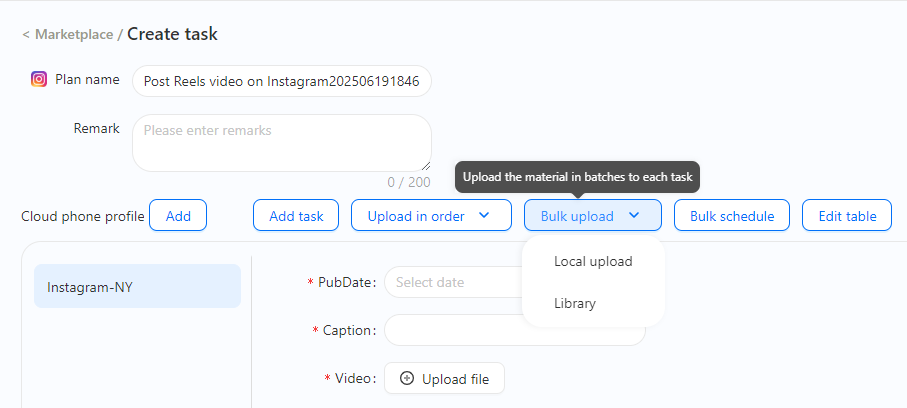
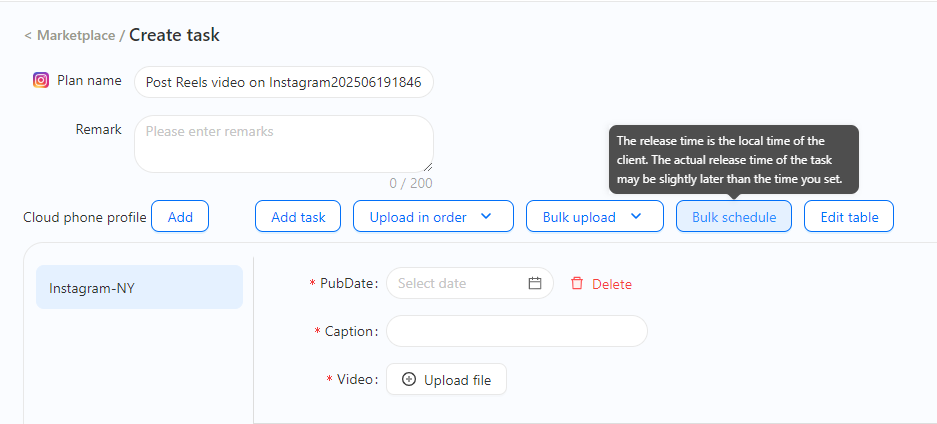
Serial number matching: Automatically matches uploads when the material name is consistent with the environment’s serial number, using formats like serial number-number.Bulk upload: Upload the same video from your local files or creatives library to several cloud phones/tasks at once.Bulk Schedule: This powerful feature helps you manage multiple tasks or profiles at once. You can configure:
Intervals between posts for different cloud phones or tasks.
A specific Start time for the entire batch.
The Interval (minutes) between individual posts.
Important Note: The release time is based on the client’s local time. The actual release time may be slightly later than the exact time you set due to system processing.
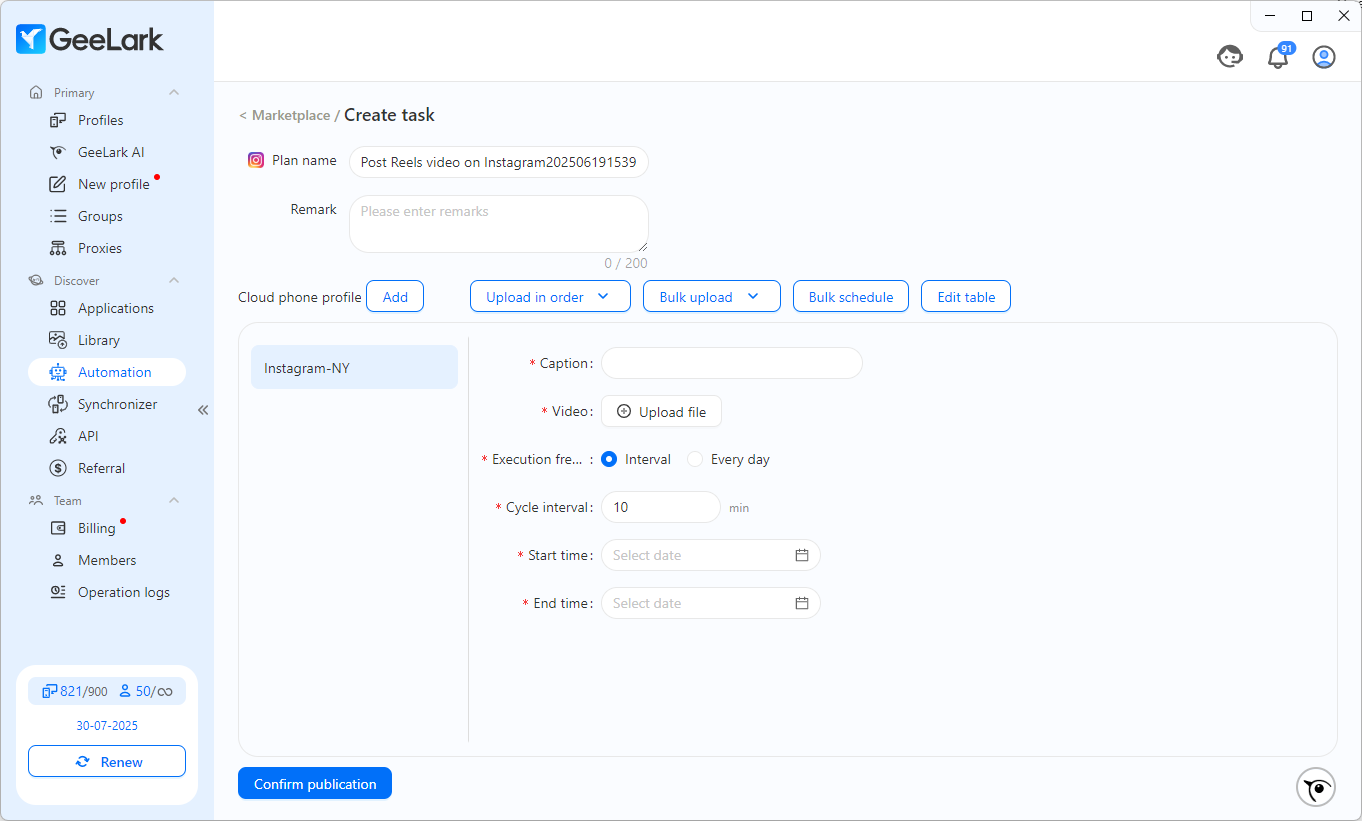
2. Create a Recurring Task:
This functions like a regular task but runs continuously in a loop, ideal for always-on content strategies. You can configure:
The Caption for the Reel.
The Video file to be used.
The Execution frequency (how often it posts).
The Cycle interval (the duration between each loop).
A specific Start time and End time for the recurring process.
3. Create a Custom Process:
This option provides the ultimate flexibility to build a highly customized automation process from scratch.You have a wide range of page operations you can customize, such as opening specific apps, navigating back, using the on-screen keyboard for text input, and even performing long-press actions. You can specify all these operations precisely to match your unique needs.
Step 3: Launch the Task
The final step is to activate your Reels posting strategy:
Carefully review all the settings you’ve configured—the selected profiles, the Reels content, captions, and the scheduling parameters.
Once you’re satisfied, click Confirm publication.GeeLark will then automatically begin to Post Reels video on Instagram according to your setup.
Lots of businesses find success with Instagram Reels! These short videos are super popular right now. They let you show off your products or services in a fun, quick way. You can use trending sounds and challenges to get more people to see your content and learn about what you do.
The easiest way to streamline your Reels workflow is by using GeeLark’s automation tools. While planning and creating videos in advance is helpful, GeeLark can automate the entire posting process. You can schedule multiple Reels at once, organize your video files in the GeeLark creative library, and ensure your content is posted at optimal times.
When picking a tool, look for one that lets you schedule posts easily. It’s also great if it works well with mobile accounts, especially if you’re using something like GeeLark, which acts like a cloud-based phone. Make sure the tool keeps your account safe and has features to prevent Instagram from thinking you’re a bot.
Yes! GeeLark’s newly launched automation tool, Post Reels video on Instagram, allows you to specify unique video files and captions for each selected cloud phone/profile.
While Instagram’s native scheduler typically allows scheduling up to 75 days in advance, GeeLark’s bulk and recurring scheduling features offer robust flexibility, allowing you to plan your content calendar far into the future.
GeeLark is designed to run multiple Instagram accounts by simulating human-like behavior on mobile devices, which helps reduce the risk of detection by Instagram’s algorithms. By adhering to natural posting patterns and avoiding overly aggressive actions, automation can be a safe and effective strategy. Always ensure your content adheres to Instagram’s Community Guidelines.


")


